PokéBonk Stardust: every Lab cost and what to buy
Stardust is the Lab currency; first upgrades cost 70–100, not 1,275. Fix the problem that ended your run before saving for the fourth move.
Show full reference table
| Upgrade | What it fixes | First level |
|---|---|---|
| Stamina | +8 max HP — dying early | 85 |
| Training | +4% damage — slow kills | 85 |
| Magnetism | +0.6 pickup range — missed XP and money | 70 |
Stardust calculator
Cost from one level to another
Training: level 0 → 1 costs 85 Stardust.
Buying everything, all 111 levels, costs 65,755. The calculator uses the same table above, not an average.
What Stardust is, and how we tested it
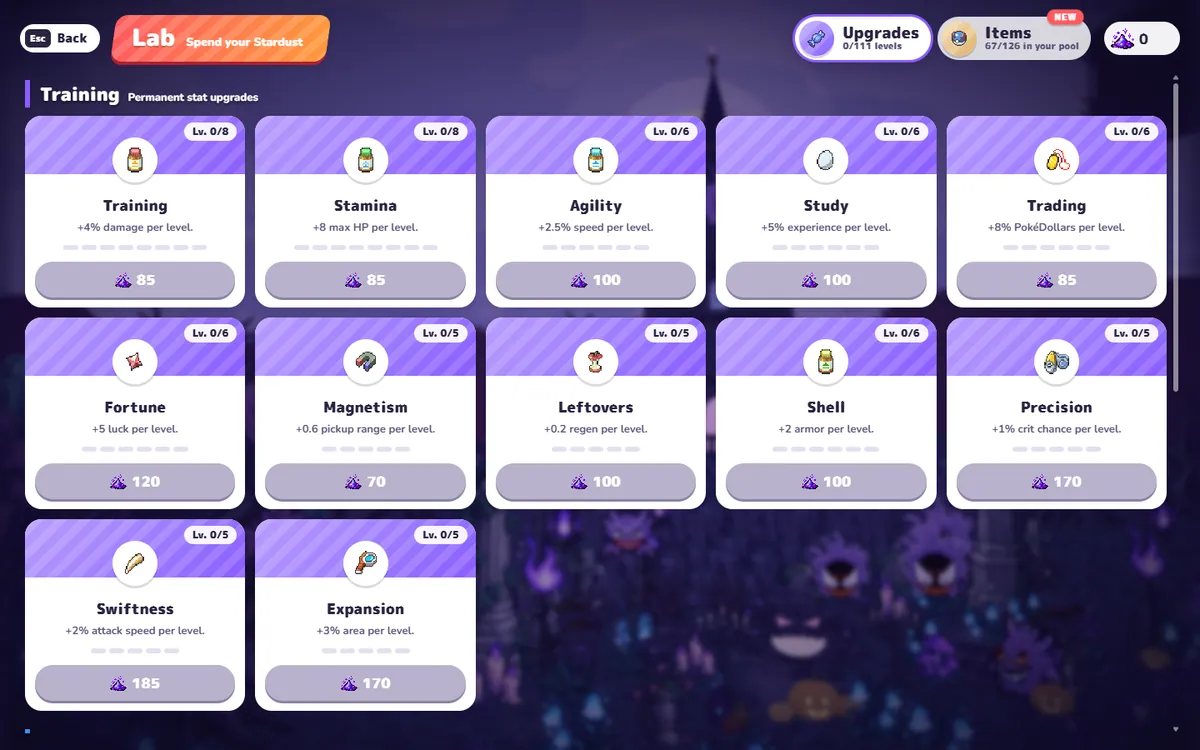
The Lab screen calls Stardust “the Lab's currency”. The in-game tutorial says you earn it at the end of every run (more the further you get), by defeating bosses, by capturing shiny Pokémon, and by completing achievements and tasks. We opened the Lab on v0.8.89 and read all 24 upgrade cards and their displayed prices; the table below uses those live menu prices, which already include the current discount and 5-dust rounding. The separate Items tab is where run items enter your Poké Ball pool; their effects are in the item catalogue.
Our two visible payouts were small: 4 Stardust for a 0:43 death, and 10 for a 1:29 run that reached level 5. We did not test a boss payout, a shiny capture, an achievement claim or the full-run reward curve, so we cannot turn those into a Stardust-per-minute figure. The costs below are firm; the income rate is not.
All 24 Lab upgrades and every level price
There are 24 upgrades and 111 total levels. Each row lists the price for level 1 through the maximum level in order. All levels together cost 65,755 Stardust.
Show full reference table
| Upgrade | Effect per level | Max | Cost by level (Stardust) | Full cost |
|---|---|---|---|---|
| 4th move tool | Unlocks the fourth move slot. | 1 | 1: 1,275 | 1,275 |
| Vitamin slots tool | +1 vitamin slot per level. | 2 | 1: 1,020 · 2: 2,550 | 3,570 |
| Refresh tool | +1 Refresh use per run. | 6 | 1: 100 · 2: 145 · 3: 200 · 4: 280 · 5: 390 · 6: 550 | 1,665 |
| Skip tool | +1 Skip use per run; Skip grants PokéDollars. | 6 | 1: 70 · 2: 95 · 3: 135 · 4: 185 · 5: 260 · 6: 365 | 1,110 |
| Banish tool | +1 Banish use; removes an option for the rest of the run. | 6 | 1: 130 · 2: 180 · 3: 250 · 4: 350 · 5: 490 · 6: 685 | 2,085 |
| Fourth option tool | Level-ups offer four options instead of three. | 1 | 1: 2,550 | 2,550 |
| Training stat | +4% damage per level. | 8 | 1: 85 · 2: 120 · 3: 165 · 4: 235 · 5: 325 · 6: 455 · 7: 640 · 8: 895 | 2,920 |
| Stamina stat | +8 max HP per level. | 8 | 1: 85 · 2: 120 · 3: 165 · 4: 235 · 5: 325 · 6: 455 · 7: 640 · 8: 895 | 2,920 |
| Agility stat | +2.5% movement speed per level. | 6 | 1: 100 · 2: 150 · 3: 215 · 4: 310 · 5: 450 · 6: 655 | 1,880 |
| Study stat | +5% experience per level. | 6 | 1: 100 · 2: 150 · 3: 215 · 4: 310 · 5: 450 · 6: 655 | 1,880 |
| Trading stat | +8% PokéDollars per level. | 6 | 1: 85 · 2: 125 · 3: 180 · 4: 260 · 5: 375 · 6: 545 | 1,570 |
| Fortune stat | +5 luck per level. | 6 | 1: 120 · 2: 175 · 3: 250 · 4: 365 · 5: 525 · 6: 765 | 2,200 |
| Magnetism stat | +0.6 pickup range per level. | 5 | 1: 70 · 2: 100 · 3: 145 · 4: 205 · 5: 300 | 820 |
| Leftovers stat | +0.2 regeneration per level. | 5 | 1: 100 · 2: 150 · 3: 215 · 4: 310 · 5: 450 | 1,225 |
| Shell stat | +2 armor per level. | 6 | 1: 100 · 2: 150 · 3: 215 · 4: 310 · 5: 450 · 6: 655 | 1,880 |
| Revive tool | Start each run with a Max Revive. | 1 | 1: 4,250 | 4,250 |
| Research tool | +25% research progress per level. | 4 | 1: 215 · 2: 340 · 3: 545 · 4: 870 | 1,970 |
| Support team tool | +1 slot for captured Alphas, from 2 to 3. | 1 | 1: 2,975 | 2,975 |
| Archive tool | +5 Archive slots per level; every 2 unlocked items add 1 more. | 6 | 1: 510 · 2: 1,020 · 3: 1,700 · 4: 2,550 · 5: 3,400 · 6: 4,675 | 13,855 |
| Precision stat | +1% critical-hit chance per level. | 5 | 1: 170 · 2: 255 · 3: 385 · 4: 575 · 5: 860 | 2,245 |
| Swiftness stat | +2% attack speed per level. | 5 | 1: 185 · 2: 280 · 3: 420 · 4: 630 · 5: 945 | 2,460 |
| Expansion stat | +3% area per level. | 5 | 1: 170 · 2: 255 · 3: 385 · 4: 575 · 5: 860 | 2,245 |
| Harmony tool | The Ultimate charges 4% faster per level. | 5 | 1: 215 · 2: 320 · 3: 480 · 4: 715 · 5: 1,075 | 2,805 |
| Big Bag tool | Take 3 Bag items into a run instead of 2. | 1 | 1: 3,400 | 3,400 |
Level numbers are 1-based: “1: 85” means the first purchase costs 85. These are the live menu prices, not reconstructed estimates. Archive has six levels in this build.
What to upgrade first
The Lab has 24 options, so the useful question is not “what is best?” but “what ended the last run?”. Buy the cheapest level that addresses that, then stop and play again.
Show full reference table
| Your last run | First buy | Why this one | Cost |
|---|---|---|---|
| Died before the first boss | Stamina | +8 max HP per level; cheapest direct survivability. | 85 |
| Survived but kills were slow | Training | +4% damage per level; applies to your whole run. | 85 |
| Left XP or money on the floor | Magnetism | +0.6 pickup range per level; cheapest upgrade in the Lab. | 70 |
| Bad upgrade offers | Skip or Refresh | More re-draws; Skip also gives PokéDollars. | 70 / 100 |
| Core stats are comfortable | Fourth move | Extra move slot; a big 1,275 commitment. | 1,275 |
For a first purchase I would take Stamina at 85, because my failed Bulbasaur pilot died while stationary and HP was the visible problem. If your damage is the bottleneck, Training costs the same. Do not buy the 1,275 fourth move first just because it sounds permanent: it is 15 times the price of Stamina and does nothing until you have a fourth move worth equipping.
The maths behind the table
The displayed first prices are not round numbers because the game applies the current discount and rounds to the nearest 5. For example, Training’s 85 first level rises to 120, 165 and 235 on the next three purchases. The full eight-level Training line is 2,920 Stardust. The most expensive single line is Archive at 13,855 across six levels; the most expensive one-level unlock is the 4,250 Max Revive.
If you only ever buy one upgrade, the cheapest meaningful purchase is Magnetism at 70, followed by Skip at 70 and the two 85-cost stat lines. That does not make them the strongest; it makes them the lowest-risk way to test whether the upgrade actually changes your next run.
Questions people also ask
How do you earn Stardust in PokéBonk?
The Lab tutorial says Stardust comes from finishing runs (more the further you get), defeating bosses, capturing shiny Pokémon, and completing achievements and tasks. In our tests a 0:43 death awarded 4 Stardust and a 1:29 run awarded 10. Those are two observations, not an income formula.
What should I buy first in the Lab?
Start with a cheap fix for the problem that ended your run: Stamina (85) if you die early, Training (85) if damage is the bottleneck, or Magnetism (70) if you keep missing pickups. The 1,275 fourth move and 2,550 fourth option are later purchases, not first buys.
How much Stardust does the whole Lab cost?
The 24 upgrades contain 111 levels. Buying every level at the v0.8.89 prices costs 65,755 Stardust in total. The Archive is the largest single sink at 13,855.
Do Lab upgrades apply to every run?
The Lab describes these as permanent stat upgrades, slots and tools, separate from the choices inside a run. We verified the menu, prices and descriptions, but we did not buy every upgrade or test each effect in a completed run.